How To Replace A Chevy Colorado Valve Cover Gasket
It’s common for a valve cover gasket on any car to degrade and eventually fail over time. They are subjected to a lot of heat. For this reason, your valve cover gasket will need to be replaced at some point in your car's lifetime.

The good news is that you can buy an OEM valve cover gasket specifically for your Colorado and then replace it right at home. This simple step-by-step tutorial will guide you through the process. Many Colorado owners agree that the only difficult part of this process is removing the bolts on the bottom of the throttle body case. It’s definitely a job you can tackle as long as you have the right tools and some patience.
Tools To Get First
- 10mm socket
- 15mm socket
- Flathead screwdriver
- A socket wrench extension set
- T25 Torx wrench
- Ratchet wrench
Of course, you also need a replacement valve cover or gasket before you’re able to start the job. You can order a genuine OEM valve cover or valve cover gasket from us at a great discounted price. If you have a 2007-2012 Colorado, check out these parts: valve cover (part no. 12631008) and valve cover gasket (part no. 89018220).
Steps To Take
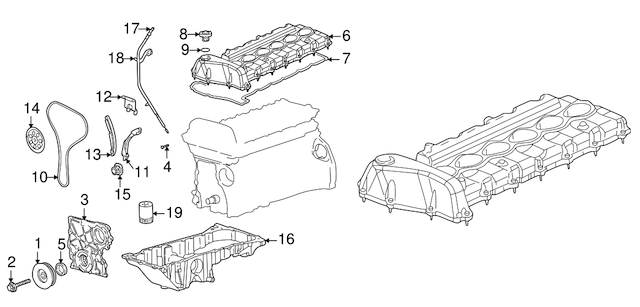
The valve cover gasket is located between the valve cover and the cylinder head. It’s a rubber part that seals in the gap between the cover and the head. To remove the valve cover gasket and replace it with a new one, take the following steps:
- Lift the front end of your truck just high enough to remove the left front tire. Support the truck with a jack stand.
- Remove the wheel on the driver’s side.
- Disconnect the rubber hose from the battery cover. You can just pull it off.
- Disconnect both of the battery’s electrical connectors. Remove all the bolts holding the battery cover down, and then remove the battery cover.
- Undo all of the bolts holding the battery in place, and then remove the battery.
- Remove the battery tray.
- Go into the wheel well on the driver’s side and then pry off all of the fender liner plastic fasteners with a flathead screwdriver. Remove the fender liner.
- After the fender liner is off, you can see the two bolts on the bottom of the throttle body case if you look behind the electrical wiring. Unscrew these bolts, as well as the bolts on top of the case.
- Remove tension from the serpentine belt, and slide the belt off of the alternator. (Do not fully remove the belt.)
- Remove three alternator mounting bolts. Move the alternator enough to allow access to the last throttle body case bolt. Remove that bolt. (If you do not remove this bolt, and you flex the cover too much, you may cause a vacuum leak.)
- Unplug the wiring harnesses that cross over the top of the valve cover.
- Remove the fuel injectors.
- Remove the throttle body from the throttle body case.
- Remove the fasteners from the wiring harness bridge that crosses the front of the valve cover.
- Remove all of the valve cover mounting bolts.
- Carefully remove the valve cover. Shift the throttle body case to the left to make the removal process easier.
- Peel off the old valve cover gasket.
- Clean the area where the new gasket is going on.
- With your finger, rub the valve cover gasket with petroleum oil to lubricate it. This helps the gasket to slide a bit when you are putting the valve cover into place. This protects the gasket from tearing.
- Put the new valve cover gasket in the valve cover. You will also need to apply oil and place the fuel injector valve cover gaskets into the valve cover. Press all of the gaskets in firmly so they don't fall out when you flip the cover over.
- Carefully slide the valve cover into position. Make sure the gasket doesn’t get shifted out of place. Finger tighten the bolts in a star pattern. Then use a wrench to tighten them an additional half turn. Be careful not to over-tighten any of these bolts.
- Reconnect and reinstall all of the remaining parts in the reverse order of removal.
Need To Replace The Valve Cover Instead?
Sometimes it’s difficult to differentiate between a valve cover leak and a gasket leak. If you find that your valve cover needs to be replaced instead of the gasket, you can still use this tutorial. You should still replace the valve cover gasket at the same time. Many, but not all, new valve covers come with new gaskets.
You’re welcome to contact us with any questions about replacing your valve cover gasket.