How To Replace A GM Control Arm
The control arm is a part of the front suspension and connects the front wheel to the vehicle's frame. It's vital to your vehicle's handling because it allows you to steer the car while the wheel moves up and down with the road surface. Occasionally control arms wear out (learn what signs and symptoms to watch for in this article) and need to be replaced. In this post, we'll cover how to do the job yourself, including:
- Tools you'll need to do the work
- Prep work and helpful tips
- Control arm removal
- Control arm installation
Tools You'll Need To Replace A Control Arm

Image Credit: Aaron Hines
Most GM cars and trucks use a McPherson strut front suspension, which combines the front springs and shock absorbers. It's also the most common setup used on modern vehicles. To change a control arm on a McPherson strut front suspension, you'll need the following tools:
- Gloves
- Safety glasses
- Floor jack and jack stands
- Wheel chocks
- Pry bar
- Large mallet or hammer
- Ratchet and/or combination wrenches
- Pliers
- Torque wrench
The following tools aren't required but are helpful for the job:
- Ball joint separator
- Pickle fork
Preparation For Replacing A Control Arm
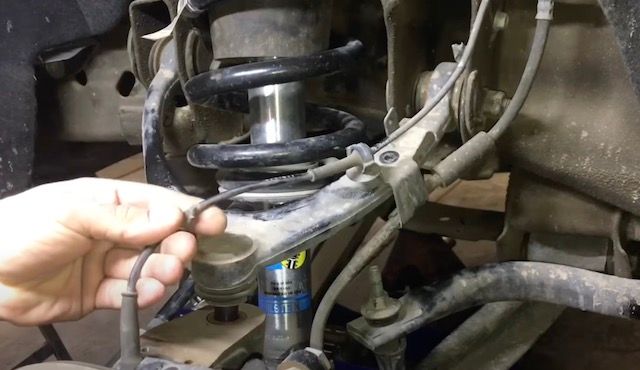
Image Credit: Aaron Hines
Here are some helpful tips before getting started:
- Control arms should be replaced in pairs. Not only is it practical to replace both control arms at the same time, but if one control arm is failing, the other isn't far behind.
- It's also a good idea to replace your ball joints at the same time. This also can save you time and effort later. You may need to replace them anyway if they get damaged when removing the control arms.
- A good repair manual or shop manual for the make and model of your vehicle is invaluable. It will provide specific instructions and tips for your car or truck.
- The nuts and bolts holding your control arm in place will most likely be rusted and caked in grime. It's a good idea to soak them with penetrating oil before trying to remove them.
Here's what you need to do to get started:
- Park your vehicle on a flat surface, preferably in the driveway or garage.
- Set the parking brake and place wheel chocks behind the rear wheels.
- Loosen the lug nuts on your front wheels.
- Jack up the front of your car and place the jack stands under the frame. If you're unsure where to place the jack or jack stands, consult your owner's manual.
- Once the front wheels are off the ground, remove the lug nuts and wheels from the front suspension and place them out of the way.
Control Arm Removal
- If your vehicle has a front sway bar, disconnect it from the control arm.
- Remove the cotter pin from the ball joint castle nut by pulling on the closed end with a pair of pliers. Then remove the castle nut from the ball joint.
- Remove the ball joint from the steering knuckle. You can use a ball joint separator or pickle fork or hit the steering knuckle with a large mallet or hammer.
- Remove the bolts securing the control arm to the frame. It will help to soak them in penetrating oil before removing them.
- Slide the control arm from the frame mounting bracket. You may need to use a mallet or pry bar if it doesn't come off easily.
Control Arm Installation

- Slide the new control arm into the frame mounting bracket and install the bolts (we recommend using only OEM control arms for the reasons you'll find here). Do not tighten the bolts because they will need to be adjusted later.
- Install the ball joint in the steering knuckle, and then add the castle nut. Tighten the castle nut to the torque specification in your vehicle's service manual.
- Install the new cotter pin into the castle nut and bend the open ends, so the pin is secure.
- Reattach the sway bar link to the control arm.
- Reinstall the front wheels and lug nuts.
- Use the jack to remove the jack stands and lower the vehicle.
- When the front wheels are on the ground, check the lug nuts and tighten them to the correct specifications.
- Tighten the nuts on the control arm and sway bar to the specifications in your vehicle's manual. You may need to turn your front wheels to the side to access the bolts in the control arms and sway bar.
Take the vehicle for a short test drive to check for any binding or clunking noises. You'll also want the front end realigned by a repair shop to ensure the vehicle handles properly and the front tires wear evenly.
Find OEM GM Control Arms At GM Parts Center
To find the right control arms for your Chevrolet, Buick, GMC, Cadillac, Pontiac, Saturn, Hummer, or Oldsmobile, check out our parts catalog. We only sell genuine GM parts and accessories backed by GM's replacement parts warranty.
Got questions? Our FAQs page contains lots of helpful information, or you can contact us if you have questions about your vehicle.